»Visit www.metrocount.com »Contact MetroCount

Maps (MCSetup)

Overview

A map in MCSetup consists of a Map File, which uses a .mpz file extension. This file contains a pointer to the location of the map's bitmap image, and additional information about the map, such as latitude and longitude.

A Site List can have several attached maps, with sites distributed across them. Also, a single map can be shared amongst several Site Lists.

Each Site List can also have a map designated as the Metamap. This is usually a low detail map that encompasses each of a group of smaller, high detail maps.

Preparing Maps

Site Lists support maps in the form of bitmap images, including common compressed bitmap formats, such as JPEG. Such images can be sourced from many locations, including local street directories, or exported from a vector-based mapping system.

Suitable bitmap images should contain sufficient detail to allow sites to be placed with reasonable accuracy, based on the screen size where MCSetup will be used. Remember that multiple maps can be associated with each Site List, as well as a low-detail Metamap.

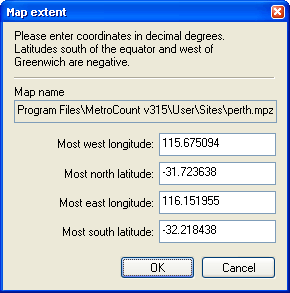
In order to use a bitmap image, the corresponding Map File must first be generated. A Map File contains a pointer to the bitmap image for the map, and the latitude and longitude of the bounding rectangle of the map. The Map File is then attached to Site Lists as required.

Note that when generating a Map File, the latitude of the top and bottom boundaries, and the longitude of the left and right boundaries of the image will be beneficial. These coordinates are used for a number of purposes:

  • Assigning coordinates to sites placed on a map.

  • Locating sites on a map.

  • Displaying the bounding rectangles of each attached map on the Metamap.

  • Locating and placing sites using a GPS unit.

If the bounding coordinate information is not available, it is still possible to use maps in Site Lists, however the functionality listed above may be limited. Alternatively, for adjoining maps, simply make up coordinates that reflect the maps' relationships. This will still allow sites to be placed and located on the map.

[Procedure]To generate a Map File
  1. For convenience, the images to be used for maps should be copied to the Site List folder specified in MCSetup's Preferences. The default folder is the User \ Sites folder located where MTE is installed.

  2. In MCSetup, select File » Create map.

  3. In the Open map image dialog box, select an image for the new map. Note the image-type filter at the bottom. When done, click the OK button.

  4. In the Map extent dialog box, enter the coordinates for the bounding lines of the map.

    Coordinates south of the equator and west of Greenwich are negative.

    Entering the map's bounding latitude and longitude

    Entering the map's bounding latitude and longitude

  5. Click the OK button. A Map File with the same name as the bitmap image, and a .mpz file extension will be created in the Site Lists folder.

Attaching Maps to a Site List

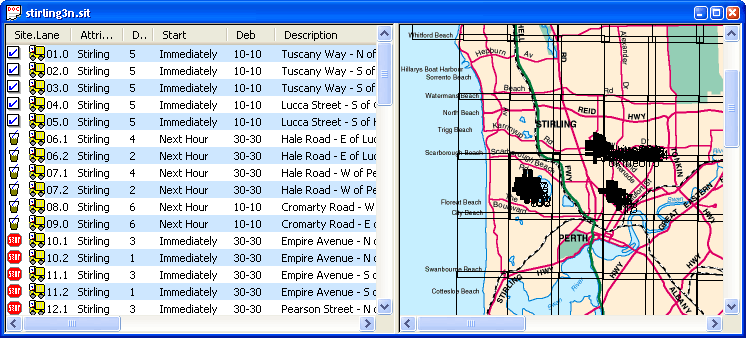
To display maps in a Site List, the respective Map Files must first be attached to the Site List. The Maintain maps dialog box is used to manage the list of maps associated with a Site List.

Attaching maps

Attaching maps

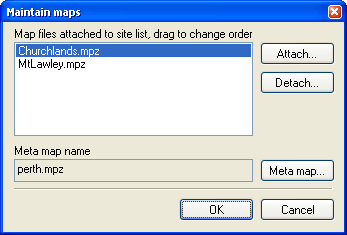
Note that the items in the list have a descending priority (the top of the list has the highest priority). When locating sites, if the area of two or more maps intersect, the map with the higher priority will be displayed.

[Procedure]To attach maps to a Site List
  1. Right-click in the list pane of a Site List, and select Maintain maps from the pop-up menu.

  2. In the Maintain maps dialog box, click the Attach button.

  3. Select one or more Map Files to attach to this Site List, and click the OK button.

  4. Reorder the attached maps list as required by dragging the map items.

    Note that maps can be disassociated from the Site List selecting, and clicking the Detach button.

  5. Click the OK button to return to the Site List.

Navigating Maps

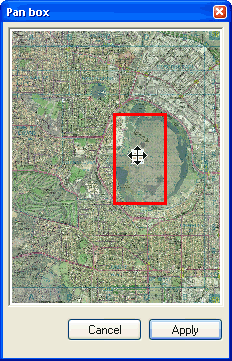
When placing sites on a map, the target map will first need to be selected from the list of attached maps, and displayed. Depending on screen size, the target map may need to panned and scrolled to locate the desired position for a site.

[Procedure]To switch the displayed map
  1. Right-click in the list pane of a Site List, and select Maintain maps from the pop-up menu.

  2. Select the desired map, and click the OK button. The selected map will be displayed in the map pane of the Site List.

[Procedure]To pan around a map
  1. The Pan box dialog box displays a smaller version of the entire map. The rectangle indicates the area of the map currently being displayed. Click and drag this rectangle to display a new area of the map.

    Panning around a map

    Panning around a map

  2. Click the Apply button.

[Procedure]To toggle the Site List splitter position
  • Select View » Toggle splitter. This will toggle the orientation of the splitter bar between the list pane and the map pane.

    Optionally toggle the splitter bar position

    Optionally toggle the splitter bar position

Using the Metamap

The Metamap is intended to be a map that encompasses the other maps attached to a given Site List. When the Metamap is displayed, the bounding rectangles of each of the attached maps will be overlaid, assuming the correct coordinates have been entered for each map. Detail maps can be selected directly from the Metamap.

[Procedure]To set the Metamap for a Site List
  1. Right-click in the list pane of a Site List, and select Maintain maps from the pop-up menu.

  2. In the Maintain maps dialog box, click the Metamap button.

  3. Select the desired Map File, and click the Open button.

  4. Click the OK button to return to the Site List.

[Procedure]To display the Metamap
  • Right-click in the map pane of a Site List, and select Show metamap from the pop-up menu. Note that if a Metamap has not been designated, this option will be unavailable.

[Procedure]To select an attached map from the Metamap
  • With the correct latitude and longitude entered for each map, the Metamap will contain black rectangles for the bounding area of each of the attached maps. Right-click within a rectangle, and select Find detail map to display that location.

    Example Metamap - the bounding rectangles are the attached maps

    Example Metamap - the bounding rectangles are the attached maps

Placing Sites on a Map

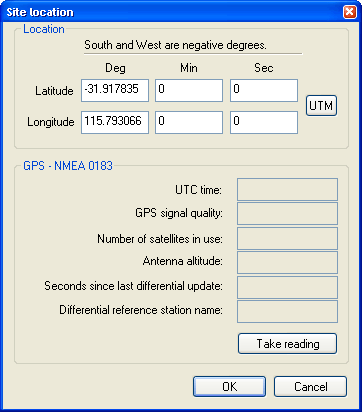
Each site in a Site List has an associated latitude and longitude for placing and locating the site on a map. The location of a site can be set in a number of ways:

  • Create a new site directly on a map.

  • Drag an existing site onto the map.

  • Manually enter a site's coordinates.

  • Use a GPS unit to automatically set a site's coordinates.

Using the first two methods described above, the site's coordinates are derived from the map's bounding latitude and longitude coordinates.

Using the last two methods where the coordinates are specified, if one of the attached maps contains these coordinates, MCSetup will automatically display the site on that map.

[Procedure]To create a new site on a map
  1. Display the map that will contain the new site, and scroll to the desired location.

  2. Place the mouse pointer at the precise location, right-click and select New site from the pop-up menu.

  3. Follow the usual procedure for adding a site.

[Procedure]To place an existing site on a map
  1. Display the map that will contain the existing site, and scroll to the desired location.

  2. In the list pane, locate the site to be placed on a map.

  3. Click-and-drag the site onto the map, dropping it at the precise location. Note that a group of sites can be selected and dragged to place them at the same location, such as multi-lane sites.

  4. Confirm the site location by clicking the OK button. The selected site(s) will appear.

[Procedure]To manually enter a site's coordinates
  1. While creating or editing a site, click the Location button.

  2. Enter the coordinates in the Latitude and Longitude edit boxes. To enter the coordinates using Universal Transverse Mercator, click the UTM button, and enter the site coordinates using Eastings, Northings and the UTM zone.

    Setting the coordinates for a siteSetting the coordinates for a site

    Setting the coordinates for a site

  3. Click the OK button to update the site's coordinates.

Locating Sites

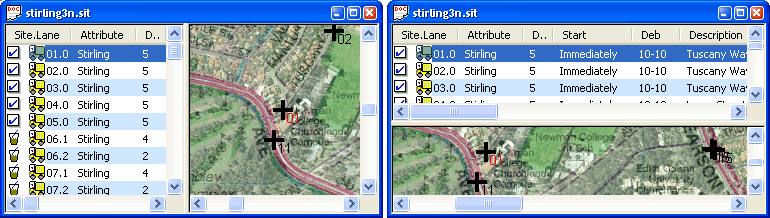
Using a Site List's attached maps is the simplest method for locating the correct list item for a given site. Once a site has been located on a map, MCSetup can automatically select the corresponding item in the list pane, which can then be easily setup. Conversely, MCSetup can automatically display the map location for a selected site in the list pane.

[Procedure]To toggle the site highlight
  • Double-click a map, or right-click a map and select Flash sites from the pop-up menu. This will shade the map to make visually finding sites easier.

[Procedure]To locate a site from a map
  • Locate a site on a map, right-click on top of the site, and select Locate site from the pop-up menu. The corresponding site will be selected in the list pane. Note that if there are multiple sites extremely close together at the point selected, all of those sites will be selected in the list pane.

[Procedure]To locate a site's location on a map
  1. In the list pane of a Site List, right-click a site to be located, and select Find on map from the pop-up menu. If the site can be found within one of the Site List's attached maps, MCSetup will display that map with the selected site centred in the Map pane. The selected site name will also be displayed in red.

  2. MCSetup will automatically enable the site highlight feature that will shade the map. If necessary, double-click the map to turn the shading off.